Click here for the 'Seeds of Eaden' seed shop
Ride on mowers are an effective way of cutting larger grass areas
quickly and are an essential piece of equipment for large gardens.
However they do need to be used carefully and in a safe manner.
This article outlines an effective safe use of ride-on rotary &
cylinder mowers
The main hazards of operating ride on mowers are:
- Foot and hand injuries caused by contact with cutting blades.
- Eye and Body injuries caused by debris being discharged by the cutting blades.
- Hearing loss caused by exposure to high noise levels.
- Injury caused by fire or explosion resulting from poor refuelling techniques, leaks or a build up of grass around hot parts of the machine.
- Whole Body Vibration Syndrome (WBVS) and Hand Arm Vibration (HAVS) caused by vibrating machine.
- Injury caused by overturning of machine when operating on slopes or descending/ascending ramps.
- Injury caused by slips, trips or falls.
- Varying toxic effects caused by poisoning, inhalation, ingestion or eye injury from hazardous substances (oil, fuel & greases).
- Occupational dermatitis from contact with hazardous substances.
- Contact with vehicle when working adjacent to highway or travelling on highway.
- Contact with pedestrians when working in public areas.
- Carbon monoxide poisoning from exhaust fumes building up in a confined space.
Precautions
Operatives should be familiar with the operator’s manual for the machine
that they are operating and know how to stop the machine quickly in an
emergency.
Suitable PPE should be worn when operating the machinery such as safety boots
and eye protection. Ear protection must be worn where the noise level of the
machine exceeds guidance. Gloves must be worn to prevent cuts and abrasions
when carrying out maintenance. During cold weather wear gloves to keep hands
warm, maintain a good blood flow and reduce the risk of injury from HAVS. Long
trousers must be worn to prevent injury caused by objects discharged from the
machine.
Ensure machine is maintained as detailed in the operator’s manual and
records retained of maintenance carried out. Carry out daily
maintenance and safety checks before use (details of machine specific checks
can be located in the operator’s manual) as follows:
- Check to ensure all guards are in place, drive belts are adjusted correctly
and all grease points are greased. Ensure the oil level and fuel levels are
correct and that there are no leaks.
- Check that all interlocks function correctly.
- Clean relevant filters and top up radiator coolant level.
- Check the operation of the Operator Presence Controls (on most machines
there is a sensor below the operators seat).
- Check the condition of the tyres and that they are correctly inflated.
- Check that the mower is in good working order, in particular the brakes
and steering. Pedals all move freely, that all lights and beacons fitted work,
as does the horn.
- Check the hydraulic system is functioning and that the hoses and
fittings are not damage.
- Ensure all latches are secured. (Most machines have latches which when
undone allow access to parts of the machine for maintenance purposes).
- Check that the blades, the blade bolts are not damaged, excessively worn
and are adjusted correctly.
- Clean any grass from the machine, especially around the exhaust manifold
and cooling fins. If box mowing ensure that grass collector is fitted and if
fly cutting ensure that the correct deflector is fitted and in the correct
position. .

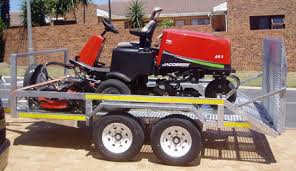
When transporting the machine to and from site, by van or trailer,
ensure that it is fastened safely to prevent movement. Ensure that the cutter
heads are raised and that the latches and safety locks are in position. The
machine must be switched off during transit and fuel lines turned off where
applicable. When loading or unloading use ramps.
If the machine is travelling on the public highway it must be
roadworthy, taxed and fully fitted with a road legal kit. The operator must be
suitably licensed to drive on the road and must adhere to the laws of the
road. Passengers must never be carried on the machine.
Designate an area for refuelling away from ignition sources, preferably
in the shade. Fuel must be stored in a suitable and clearly marked container
and secured against unauthorized access i.e. children or other third parties.
Fuels, oils and greases must be handled as detailed in the relevant COSHH
Assessment. Never smoke or handle ignition sources whilst fuelling. Make sure
correct fuel type is used. Switch the machine off and allow it to cool, before
adding fuel in a well-ventilated area. Be careful, and use a funnel (if
required) when filling, to prevent spills. Wipe off any small spillages and use
a spill kit for larger spills.
Before commencing work check the work area and remove any objects that
may be discharged by or cause damage to the blades. Look out for hazards and
the ground conditions are suitable i.e. not too wet, uneven or too steep for
the machine. If obstructions cannot be removed (e.g. man hole cover) then
remember the locations and cut around them.
If you strike an obstruction then stop the machine immediately, then lift the
cutter heads to the transport position and engage the safety locks or lower the
cutter heads to the ground. Apply the hand brake and then remove the key, and
investigate. Inspect for damage and make repairs, if the damage cannot be
repaired do not operate the machine until the repair has taken place and the
defect is remedied.

Choose the correct machine for the task and ensure that a safe working area can
be maintained. If third parties breach the safe working area then stop work
immediately until the safe area can be maintained again. Pay particular
attention to children and animals.
If the machine is fitted with an adjustable seat and/or steering wheel,
adjust these to suit the operator. By adjusting these the correct posture will
be adopted by the operator.
Always ensure that roll bars are situated in the up position to prevent
risk of injury if the machinery overturns. Ensure the a seat restraint is
also worn by operators.
It may be necessary to wear hi-visibility clothing and operate the flashing
beacon (if fitted) to be seen. When working adjacent to a highway it may be
necessary to sign and cone off the work area.
The height of the cut should be adjusted and the machine should be
started and operated as detailed in the operator’s manual. Alter the travel
speed to allow for total control of the machine whilst travelling over the
specific site conditions. When reversing care should be taken.
Reduce speed when making turns and avoid using tight turns. In
particular great care must be taken when turning on slopes. Disengage
cutters when travelling across non-grass areas between areas of operation i.e.
gravel or tarmac paths.
Do not operate the machine on slopes greater than the maximum angle as detailed
in the operator’s manual. Stay clear of steep inclines and sharp drops. Do not
start or stop suddenly and stay alert for humps, hollows and other hidden
hazards.
 If box mowing then learn to recognise when the grass bag is full (this
may be when the airflow stops). Remove and empty the grass collector when
required by the method as detailed in the operator’s manual. Check the
collector for damage each time you empty it and replace it if necessary. Do not
operate the machine with a damaged collector.
If box mowing then learn to recognise when the grass bag is full (this
may be when the airflow stops). Remove and empty the grass collector when
required by the method as detailed in the operator’s manual. Check the
collector for damage each time you empty it and replace it if necessary. Do not
operate the machine with a damaged collector.
In areas of heavy growth it may be necessary to raise the cutters for
the first cut and lower as required to obtain the desired height.
If you hear unusual noises from the machine, stop the engine immediately, lift
the cutter heads to the transport position and engage the safety locks or lower
the cutter heads to the ground. Apply the hand brake and then remove the key,
and investigate the noise. If the problem cannot be located or resolved then
report the defect to your supervisor and do not operate the machine until the
defect is remedied.
When clearing blockages on a cylinder mower lift the cutter heads to the
transport position and engage the safety locks or lower the cutter heads to the
ground. Apply the hand brake and then remove the key to prevent accidental
starting. Always wear gloves and never rotate the cutters by hand to free a
blockage. Use a wooden instrument of a size that fits between the blades and
the cylinder, and is long enough to apply pressure in a rocking motion. When
freed, remove the wooden instrument and adjust the cylinder if required as
detailed in the operator’s manual.
When clearing blockages from a rotary mower lift the heads, lock in position
and remove the ignition key. Always wear gloves and never rotate the cutters by
hand to free a blockage. If there is a lock off to disable the cutters then it
must be applied before the obstruction is removed.
When maintaining, cleaning machines or dismounting for any other reason
lift the cutter heads to the transport position and engage the safety locks or
lower the cutter heads to the ground. Apply the hand brake and then remove the
key to prevent accidental starting.
For related articles click onto:

 I love passionflowers, they look so exotic and untypical to Britain. However there are some species that will grow very easily here and can be grown easily in your garden, including Passiflora incarnata, Passiflora careulea, and Passiflora lutea.